|
Tuning 4 Link Rear Suspensions for the Drag Strip
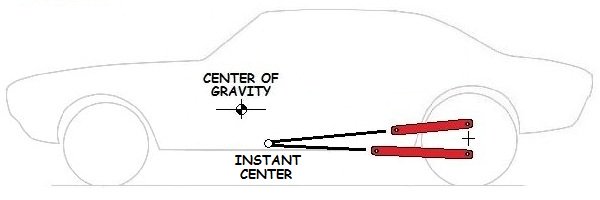
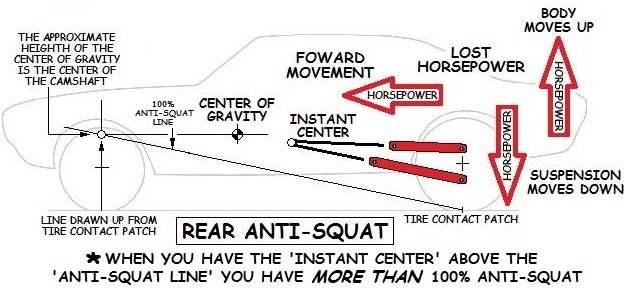
Tuning 4 link rear suspensions can make a car launch quicker and use less horsepower to do it. Which makes you faster, so you win, get famous, and live happy ever after... So, let's get into it and find out how to do it... Note: You need at least 45% of the car's weight on the rear wheels to make a 4 link suspension work properly. Also, get some graph paper. It helps to draw out what we are doing here so you can measure and be able to set up your 4 link the easy way. You don't have to be an artist, just measure your car, height and length of the 4 links, etc. and transfer them to the paper. Ok, first we need to know what an 'Instant Center' is. Imagine a line going through the lower control arm extending towards the front of the car. Now imagine a line going through the upper control arm extending until it intersects the lower line. Where this intersects is called the 'Instant Center'.
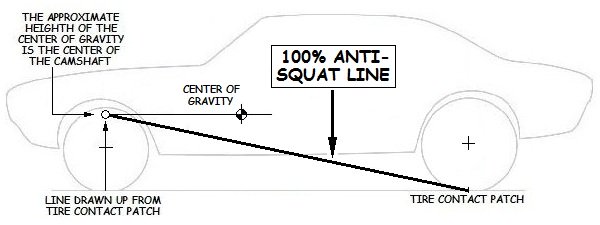
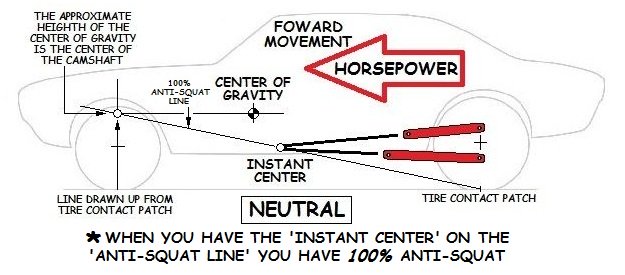
Where the 'Instant Center' is located in the car compared to the 'Center of Gravity' of the car is what determines how the suspension acts on the car to launch it. What you're shooting for is a position that will apply just enough force to the tires to make them grab without spinning and the rest of the force will launch the car. Next we will figure out where to place the 'Instant Center'. But first we have to locate our '100% Anti-Squat Line'. Huh? Theoretically, if the 'Instant Center' falls on the '100% Anti-Squat Line', the rear of the car will neither lift or squat, it will just be pushed foward. That's a good thing... So let's find it... Imagine a point on the center of the rear tire contact patch. Now imagine a point on the center of the front tire contact patch. Now take a line straight up from the front contact patch, and have it intersect the height of the center of gravity. Note: If you need to know the center of gravity of your car, click here:
How to find your Center of Gravity
Now then, let's figure out what all this means... If your 'Instant Center' falls on your '100% Anti-Squat Line', then think of your car having as having a 'neutral' setting. The rear of the car shouldn't lift or squat, and all the horsepower should launch the car.
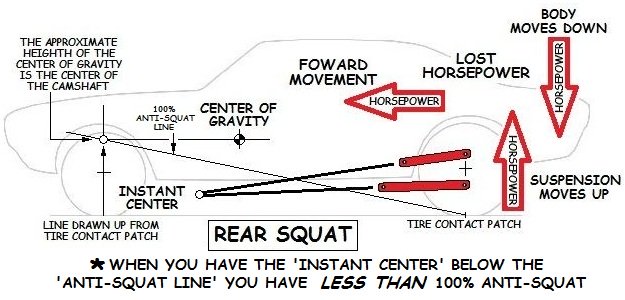
Now that's in a perfect world... There are lots of variables that affect that, so your car may want a little above the line, or a little below. This is where testing comes in. We'll get to that in a minute. Now if your 'Instant Center' falls BELOW your '100% Anti-Squat Line', you will have less than 100% Anti-Squat. The rear of your car will squat and the suspension will 'lift' lightening the rear wheels. There won't be enough force applied to the rear tires and the tires will spin.
Now if your 'Instant Center' falls ABOVE your '100% Anti-Squat Line', you will have more than 100% Anti-Squat. The rear of the car will lift and the rear tires will be forced down, sometimes violently if it's too much. This does give more traction, but it's wasting horsepower doing it... Sometimes high horsepower cars that have too much 'Anti-Squat' will force the tires down very hard for the first several feet but then start to unload the tires and spin when the chassis starts to settle.
Now that we know how it works, let's set it up! The way most people go about tuning 4 link suspensions is to get it in the general position they figured out on paper. Now experiment by launching the car and having someone watch or videotape it. Watch what the rear of the car and the tires do. Now you can see what happens and adjust from there... You're shooting for the tires to hook up without slipping, and for the car to launch foward without it lifting or squatting. If the rear of the car squats, you want to raise the 'Instant Center'. If the rear of the car lifts, you want to lower the 'Instant Center'. Note: A fully-adjustable 4 link suspension allows you to move the 'Instant Center' not only up or down, but also forward or back by increasing or decreasing the angle between the bars. If your car wheel stands too much, you can angle the 4 link bars closer together at the front to move the 'Instant Center' closer to the rear of the car. If your rear tires are being forced down too violently you can angle the 4 link bars farther apart at the front to move the 'Instant Center' closer to the front of the car. Now let's talk about 'Pre-Load'. You know when you're at the track and see a car launch and it tries to pull the left front wheel up? What you can't see is it's also pulling the right rear tire up, causing it to lose traction. It's more common on large vehicles with lots of horsepower. What's happening is the torque from the engine and driveshaft is trying to move the car, and the car is twisting around it. It's actually much more technical, but you get the idea... You don't want this to happen. That's when you want to use some 'Pre-Load'. If your 4 link bars are adjustable for length, you can do it there. The first thing you want to do is make sure the upper bars are the same length and that the lower bars are the same length. This is critical. After you get the bars the same length you need to put them back in and get the car square front to back and corner to corner. Now the right upper bar sets any type of preload you want. It is the only bar that you adjust! Leave the other three alone. 'Pre-Load' helps offset the torque from the engine. You will usually shorten the top right bar. Shortening the upper right bar adds weight to the right rear tire. A little does a lot. Try one 'flat' (on the adustment nut) at a time and keep track of how much you adjusted and the results. One-quarter turn can add as much as 50 pounds. If you want to check your 4 link setup, go to a chassis shop or find someone with portable race scales. Have them put the car on the scales weigh the car with the 4 link disconnected. Then connect the 4 link, preload it and weigh again. Then you will be able to tell if each side is preloaded the same. Alot of tuning can be done this way. Good luck!
Return from Tuning 4 Link to Suspension
|
