|
How to Set Up HVLP Spray Guns
Ok, so you've bought an HVLP gun. What's HVLP mean? How do I set up HVLP spray guns? What's HVLP mean? An HVLP (High Volume, Low Pressure) gun uses a high volume of air going through the gun to atomize the paint instead of high pressure. Even though you will have somewhere around 50 psi going into the gun, only about 10 psi will be coming out the gun at the air cap (where the paint comes out). But there will be a lot of that low pressure air coming out (high volume). Confused? Just think of it this way. Instead of a blast of 50 psi air coming out like in an old style gun only about 10psi will be coming out of an HVLP gun. In an old style gun, the 50 psi put as much paint in the air as on the car. While they worked well at atomizing the paint and applying it, they also wasted alot. The low pressure coming out of an HVLP gun applies much more paint on the car instead of in the air. So you save paint and save money... However, you need to set up the gun better to atomize the paint correctly. Which leads us to the next question: How do I set up HVLP spray guns?
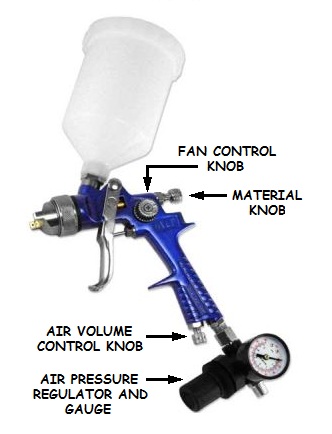
There's three things to get right... First, air supply. HVLP guns take a high volume of air (cfm- Cubic Feet per Minute) to operate right. The directions for your gun will tell you the minimum cfm it needs to operate. It's not enough for your compressor to build up pressure, it has to be able to produce enough of it constantly. So make sure your compressor is capable of enough cfm. It should say it on the side... Set your compressor so it's putting out about 90 psi. You will also need a way to set the air pressure where it enters the gun. They make small regulators with gauges that attach to the base of your gun. They look like this:
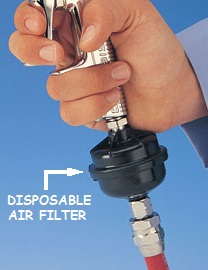
You also need an air dryer. If you have ANY water or oil in your air lines, it will RUIN your work. You need one that mounts to the wall preferably and it's a good idea to put one of the little disposable ones on the end of your gun. They look like this:
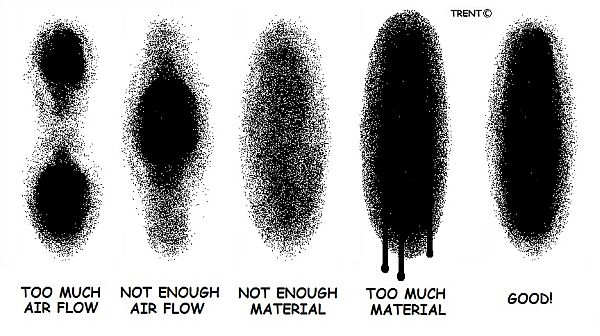
Second, choose the right tip for what you are spraying. The 'tip' is the Fluid Tip. You probably have a few that came with the gun. What you're shooting for is the smallest tip that will work right. The tech sheet for the material you are shooting will usually have a recommended tip size. However, if you don't know, a good rule of thumb is about a 1.0 tip for doing small jobs like a single panel or small part. 1.3 or 1.4 for applying paint or clear to a whole car. These sizes will also work for sealers and epoxys or etching primers. You want a bigger tip for build primers. 1.8 to 2.3 depending on the thickness. Again, read the tech sheets. Ask for them when you buy the paint or primer. They have all the info on the material. Third, lets set it up! You need to set up your gun everytime you are going to use it. Differences in humidity, temp, etc. will affect how your gun shoots that day. So let's learn how to set it up... Tape a piece of masking paper on the wall. This is for your spray test. (It's how you set up HVLP spray guns.) Now set your pressure at the gun inlet. Use your air regulator with gauge that you attached to the gun. You want to set it with the trigger pulled. Set it about 50 psi on the gauge to start. Your gun may have a maximum psi, but they are often on the low side. Most people usually run them from 40 psi to 60 psi. Close the air volume control knob (it's usually the one beside where the air hose enters the gun) and then with the trigger pulled, open it to the point where the air volume starts to stay the same (just listen to it) and then stop. That should set your air pressure and volume. Now open up your fan control knob (it's usually the top one or it's on the side) all the way and then you can turn it down a little. What you're shooting for is a fan about 6 inches tall with the gun about 6 inches from the surface. 6" at 6". Now screw the material knob (usually the second one down) in lightly until it seats. Now unscrew it about 2 1/2 turns. Now we're ready to test! Hold your gun at the paper on the wall like you're going to paint it. Hold it at 6 inches right now. Now what you want to do is pull the trigger all the way in for a split second then close it. You want a wide open to completely closed in one quick movement. What you should see now is a cigar shaped pattern on the paper. Turn your fan control knob in until you get it about 6 inches tall at 6 inches from the paper. That should set your fan control. Now leave it alone! If you change it, you change the psi at the cap. Then you would have to start all over. Now hold your gun about 8 or 9 inches from the paper. This is the distance you want to spray at. (Your pattern will now be longer since you are farther away from the paper. It should be 8-10 inches long.) Now test it again. You should have a cigar shaped pattern with full coverage in a cigar shape in the center with fading coverage going away from the full coverage. The fading coverage you see going away from the center are what you will use to "tune" your gun. It should look something like this:
Mine doesn't look like that! What's wrong? Well, let's see some different problems.
If there is too much material at either end and not much in the middle, you may have too much air flow. If there is too much material in the middle and not much at either end, you may have too little air flow. The center should be fully covered without any runs. If you do have runs, you're probably too close or holding the trigger to long. If you're not, then your gun is applying to much material. First screw the material knob in a little. Did that help? If not, then put it back where it was. Now turn down the air pressure on the regulator a little bit. Did that help? It's usually one of the two. Now that we have that taken care of, we need to tune it. What you are looking for is the smallest paint droplets possible without losing full coverage. To do this, you turn in your material control knob little bits at a time. You can also achieve the same thing by raising the air pressure, but you're probably already high enough. When you get it to where you have fine drops and just have full coverage, you're there! That's how you set up HVLP spray guns! Return from Set Up HVLP to Bodywork
|