|
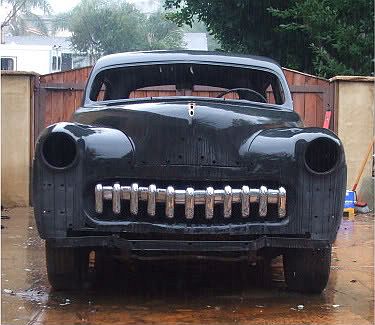
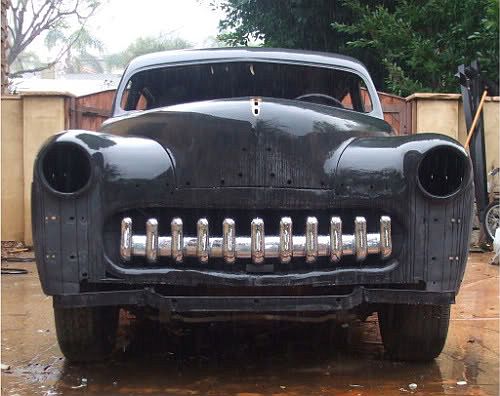
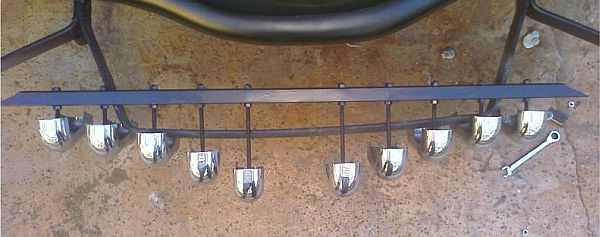
Custom Chrome Grille for Under $150-Want a custom grille without spending a fortune? This is Brandon's article on making a couple of different styles without spending a fortune... -Trent- by Brandon aka 1949windsor I am editing this to make it easier for everyone to read. I did the original version and got some great advise from the guys on here (that's why there are some requests below that will now be answered up here) and since this is a work in process I adjusted my final version and basically have 2 grilles detailed here; 1 with a cross bar and one with a floating grille: First rendition:
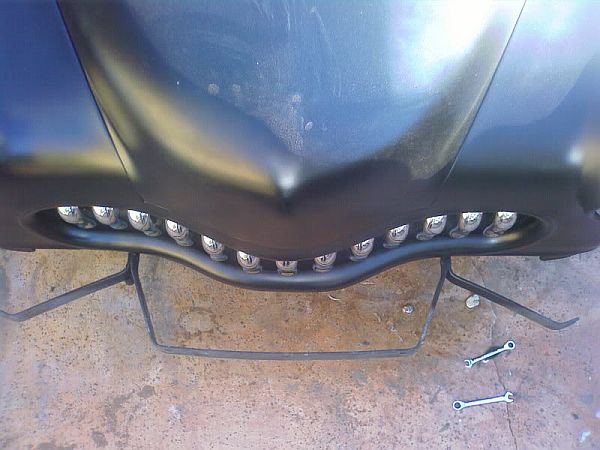
Second version (just flipped over):
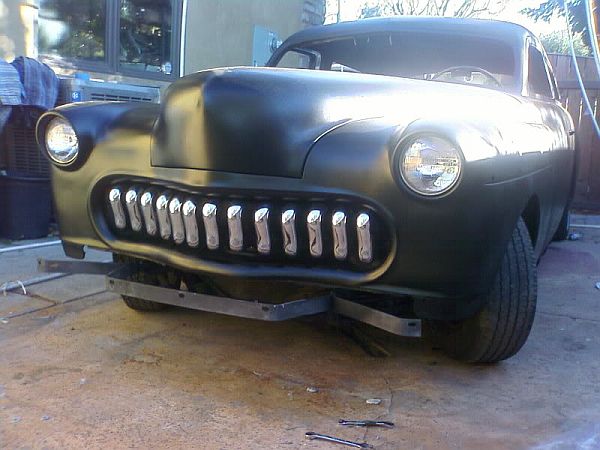
Floating Grille which I think am going with:
I was looking around for a grill for my Chrysler I have been working on and the grilles that I liked were either in good condition and way too much money or the ones I could afford were in such poor condition that after repair and re-chroming, they cost more than the good one.....Sound familiar?? I started looking around for pictures on Google Images and came across this photo:
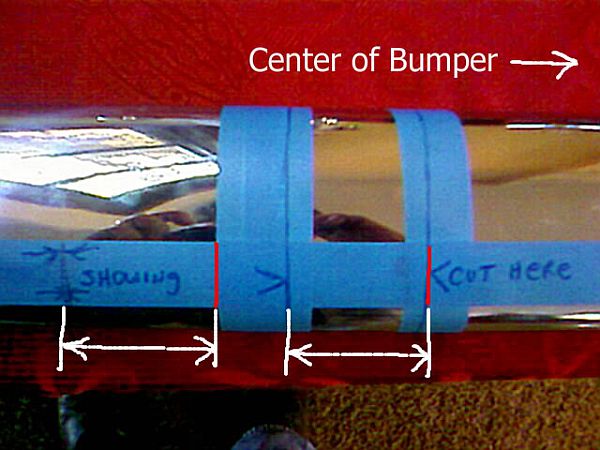
It is an early VW bug euro style bumper over rider. I thought it looked kind of cool. I remembered back in my teen years when I had a few bugs and thought that this might work. Went in to Mooreparts (a local VW parts place here in socal) and the guy behind the counter was more than helpful in measuring the bumpers and over rider for me. They are 2" wide by 7.25" tall. I went home and started calculating: $8 a piece for the over rider and $40 for the bumper.. That part definately works. I had about 9.5" of height for the grille. I thought what the hell for $140 bucks lets see what it looks like. Grille with Bar Part 1 The most important thing I can say is not measure twice but more like 8-10 times. Here is why: the bumper comes with 4 holes already drilled in it..You have to take this into account when you are laying out your grille. Here is a layout picture to help expalin:
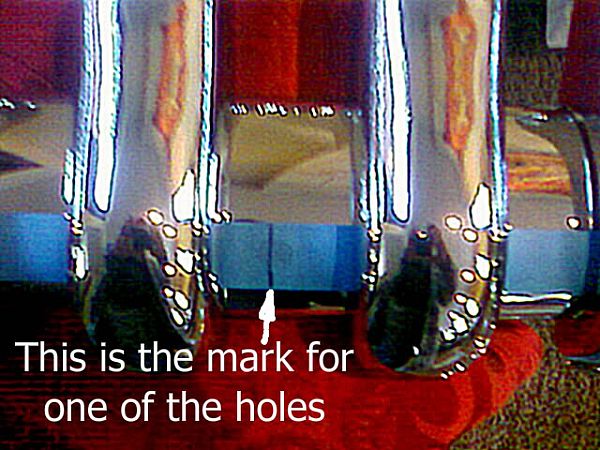
1. Measure the opening width on your car. I suggest getting a piece of cardboard or foam board and cutting it to size and set it in there to get a visual of how your finished product will look. Write down the width you want to grille to be. Mine was 42". 2. Put a piece of masking tape along the bottom of the bumper. Mark on the tape the center line of the holes that are predrilled in the bumper. 3. Mark the center line of the bumper by dividing the distance between to two of the holes you just marked. 4. Mark the width of your grille by dividing your grille width in half and measuring out from the center line. Put a second mark one inch closer to the center of the bumper. 5. Lay the over riders on the bumper (within the width you just marked) and decide how many you want depending on the spacing and width of your grille. This is purely a matter of taste. Write down how many overriders you want to use. Mine was 11. 6. Take the width of your grille and subract two inches. This gave me 40". Take the number of overriders and subtract one. This became 10 for me. Now divide your new grille width by the new number of over riders. 40" divided by 10 equals 4" of space between each over rider. Yours will be different. 7. If your original number of over riders was an odd number, start at the center line and measure and mark where each over riders will go until you end up on the mark that is 1" in from the end of your grille. If you do not end up on this mark, remeasure and check your math. 8. If your original number of over riders was an even number, start at the mark on the tape that is one inch in from the end of your grille and mark where the center of each over riders will be placed going across the bumper. You should end up at the other mark that is one inch in from the end of your grill. If you do not end up on this mark, remeasure and check your math. 9. Lay out all the over riders back on the bumper and make sure you like the way it looks, we are getting to the point on no return. 10. Check and see if any of the predrilled hole lines you marked ealiers are visible. If you do not have any of the predrilled holes visible....you suck! You get to skip the hard part and go to number 14. I had 2 holes I needed to deal with, You should have the same hole on both sides of the bumper visible, if not check your meaurements:
11. This is where it gets tricky. You are going to have to cut and weld that portion of bumper out. Measure the distance between the visible hole and the next over rider line closest to the centerline of the bumper. Write it down. Mine was 2.75" If the holes that are showing are the holes closest to the centerline of the bumper, cut that part of the bumper out where you just measured and weld back together. Then remove all tape and start over at #3 again to deal with the outside holes...I said there was a lot of measuring. If only the outer most holes are showing, cut the required amount of bumper out where the inner hole is located. If you see in the picture below I actually cut the 2.75" out about 4" closer to the center of the bumper. This eliminates any chance of part of that hole showing or interfering with drilling later on.
12. Tape and spay some galvanizing paint over you welds front and back. This will not show as the over rider covers it.
13. Almost done! Take off all the tape and go back to number 2. You already have all the measurements but you must layout the whole thing one more time. Mark where all the over riders go and double check to make sure that none of the predrilled holes are showing. 14. Check One more time or you will be very ticked off if you are wrong. 15. Drill 3/16" holes at all the points you just marked for the over riders. 16. Cut off the excess ends of the bumper. 17. Tape and spray the galvalizing paint on the ends of the bumper and on all the holes. 18. Use 1" 3/16 bolts to attatch the over riders to the bumper. 19. Build whatever mounting harware your grille needs and enjoy This actually only took about an hour and a half to do start to finish. Grille with Bar Part 2 My front end has some complex curves and when I set the grill in there I did not like the fit so I decided to make some adjustments.
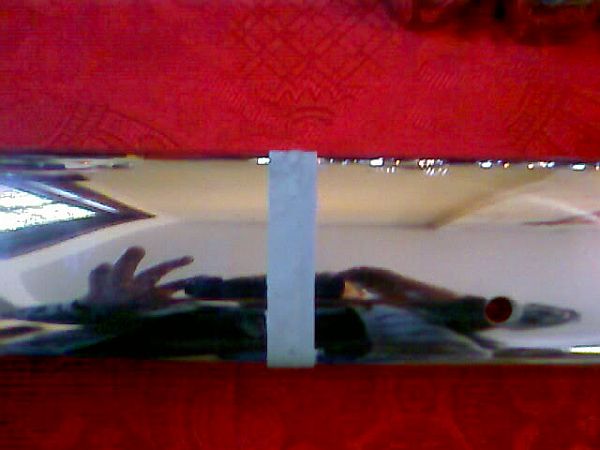
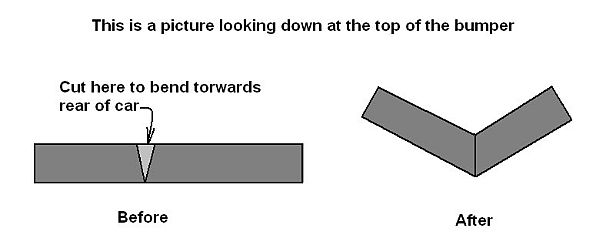
I figured since the over riders covered up the splice in the fender fine, why not use the same concept to "bend" the fender into a shape that fit better. Here is the process I used: 1. With all the over riders installed and the grille setting on some sanding sponges(for height adjustment) I set the grille in the opening where the middle tooth was aligned front to back where I wanted it. Either side had to be "bent" towards the rear of the car. 2. I pulled the grille out and drew a line from the top to the bottom of the bumper in the dead center of the over rider. Remove the over rider and cut through the curved part of the bumper on the top and bottom leaving the flat portion in the middle intact. Make sure your cut is in the dead center of the over rider and strait. DO NOT CUT ALL THE WAY THROUGH THE BUMPER 3. Now take the bumper and fold it torward the rear of the car. Once the initial bend is made it is much easier to adjust. Put the grille back in and look at the result. If you cannot bend it enough remove a little more material in a V shape.
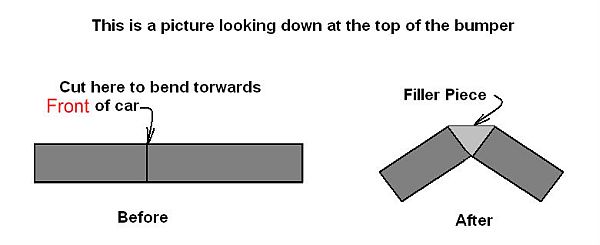
Once you have the bend the way you want it, put a good tack on the top and bottom and reinstall the over rider. Set the grille back in place and check the alignment. 4. If you want to "bend" it torwards the front of the car you use the same proceedure except DO NOT CUT a V cut, just cut a slit and fold it in the other direction. This will leave a pie shaped hole. Cut a small amount of sheet metal that fits the hole and tack weld this into place.
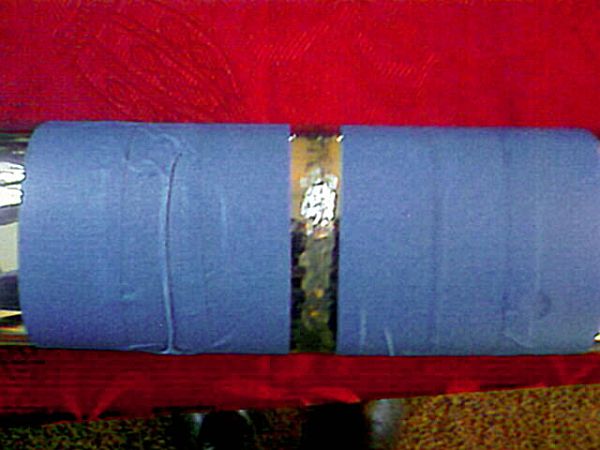
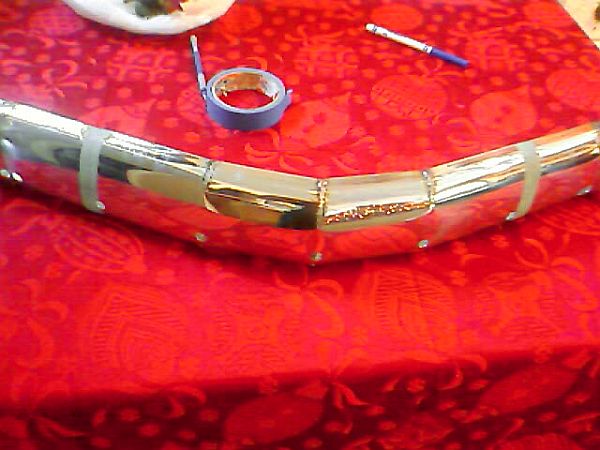
5. Make sure you reinstall each over rider as you go and check to see that everything is staying even. You can make an adjustment at each over rider to get the bend as close as you want it. Ths more over riders you have the more gradual the bend will be. 6. Once you have the bend the way you want it, remove all the over riders and weld it all together. Mine looked like this:
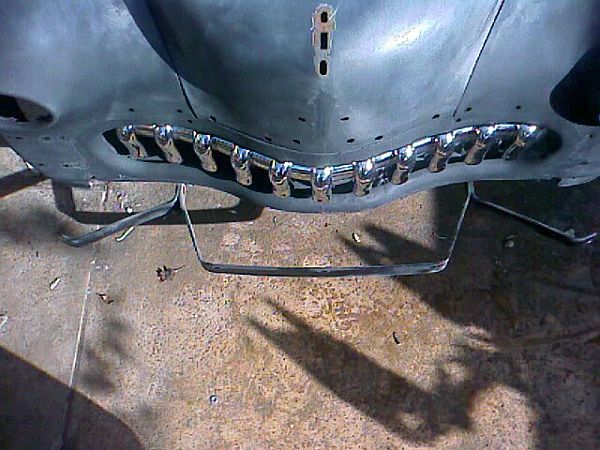
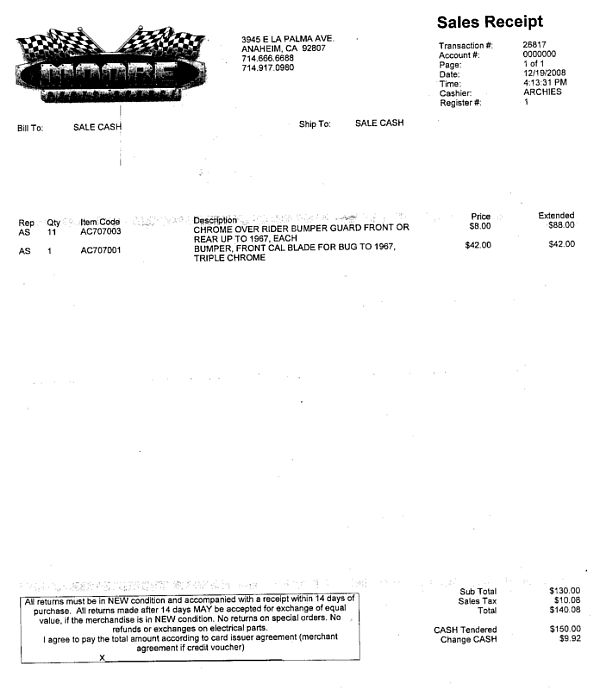
7. Tape and spray the galvanizing paint on all your welds. 8. Reinstall all the over riders on the bumper and install in the car. Take your time if you are going to do this. Make sure your adjustments are even on both sides of the bumper. I have recieved some questions via email and wanted to share the answers: The VW parts are for for the TYPE 1 beetle from 1953 to 1967. The earlier bug and ghia bumpers I think would look even better but the prices go up to about $75 per over rider and $400 to $500 for the bumper OUCH! My main advice is to take your time measuring and cutting, it is a very simple process but because you are working with finished parts, there is no room for error. Here is a copy of the reciept, all the part numbers and such.
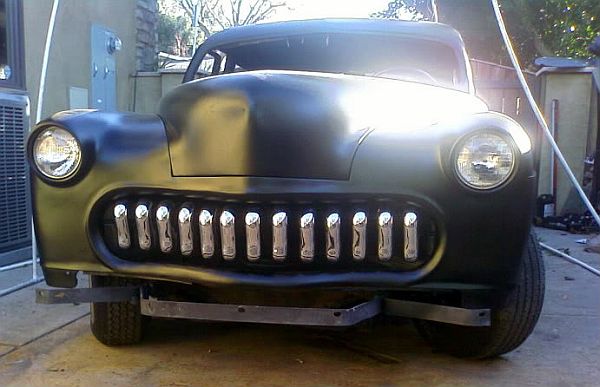
PART 2 Many people have suggested a floating grille. I liked the way the teeth looked upside down but not so much the way it looked with the bar on the top. Then taking the advise of the guys on here sugesting a floating grille I did a little photoshop removing the bar and liked it even better. I added 2 more over riders to add a little bit more shine since the bar was gone. So here is the final look and the process for the floating grille:
First I had to buy 2 more over riders $16. Then went and bought some 1" square tubing and 6 feet of 5/16-18 threaded rod. That was $8. With nuts and bolts and everything (excluding the bumper which I no longer needed) this would cost under $125. 1. Measure the opening width on your car. I suggest getting a piece of cardboard or foam board and cutting it to size and set it in there to get a visual of how your finished product will look. Write down the width you want to grille to be. Mine was 41". 2. Cut the 1" square tubing the length of the grille. 3. Lay the over riders on the tubing and decide how many you want depending on the spacing and width of your grille. This is purely a matter of taste. Write down how many over riders you want to use. Mine was 13. 4. Take the width of your grille and subract two inches. This gave me 39". Take the number of overriders and subtract one. This became 12 for me. Now divide your new grille width by the new number of over riders. 39" divided by 12 equals 3.25" of space between each over rider. Yours will be different. 5. If your original number of over riders was an odd number, start at the center line of the tube and measure and mark where each over rider will go until you end up 1" in from the end of the tube. If you do not end up on 1" from the end of the tube, remeasure and check your math. 6. If your original number of over riders was an even number, start one inch in from the end of the tube and mark where the center of each over riders will be placed going across the tube. You should end up at the other end one inch in from the end of your tube. If you do not end up on this mark, remeasure and check your math. 7. Drill 11/32 holes using a drill press on each mark. If you do not have a drill press you can use a regular drill just make sure you drill strait or you will be spending lots of time evening up the over riders once installed. 8. Cut the threaded rod into pieces that are long enough to place them where you want them front to back and at least 1 inch beyond the back of the 1" square tubing. (see photo)
6. Screw one end of the rod into the over rider a few turns and tack weld it in place to stop it from spinning on the rod. If you try and just tighten a nut down onto the over rider you will not be able to get it tight enough to stop it from moving without stripping out the thread on the over rider, trust me I tried. Make sure the rod is strait when you weld it.
7. Bolt the over riders to the square tube by using 2 bolts and lock washers per every rider. Sandwhich the square tubing between the bolts. Screw one bolt on the rod about 1.5" put on 1 lock washer and push through the hole on the square tubing. Slip one more lock washer over the end of the rod and turn the bolt a few turns. 8. Adjust the depth by pushing the over rider back up against the tubing and just turn the front bolt either clockwise to move the over rider out(toward the front of the car) or counter clockwise to move it in. Tighten the bolt on the back. Make sure it is very tight or the over rider will turn when bumped! I painted mine a flat black to hide the suport bars. This was about half the work and time involved of doing the first version. So total time on this was about 2 hours. Not bad for 2 hours and $125. Brandon Return from Custom Grille to Bodywork
|