|
Buffing Out Paint: It's Not As Hard as You Think!Need to do some buffing but not sure how to go about it? Has your paint seen better days? Do you need to buff out a new paint job? Does your old paint have swirl marks, scratches, scrapes, etc? Well here we go! What do I need to buff out paint? Glad you asked... First get yourself a buffer. There are two kinds: Rotary buffers and Random Orbital buffers. Rotary buffers simply spin and are used by professionals. They cut great, but can burn the paint if you don't know what you're doing... Random Orbital buffers don't spin, the pad kind of moves around and kind of turns slowly, just like a DA or Dual Action sander. It won't cut as fast, but it's very hard to burn your paint with one. Now if you haven't done it before, you're gonna want an oribital buffer...
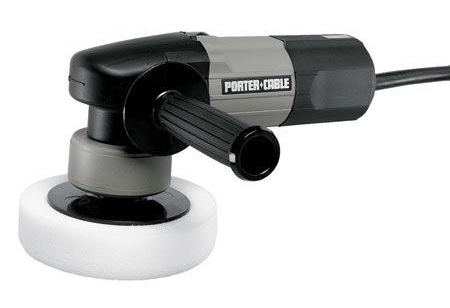
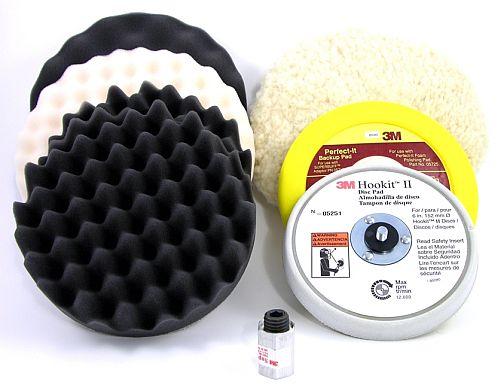
This Porter Cable 7424XP is an excellent buffer/polisher and is what most everyone uses. It's not expensive, works great, and is easy to use. Now you're gonna need some pads... A good setup is 3M's Hookit system. It consists of a backing plate and a bunch of pads: wool and foam. It works great. The backing plate & pads are a "velcro" like system which allows fast pad changes.
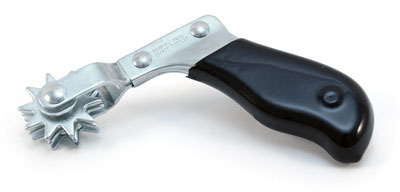
It's often cheaper to buy a 'kit' like this, than trying to buy numerous pads one at a time. The kits usually have a variety of pads for different purposes, like a wool or a coarse foam rough cut for rubbing compound up to a fine foam pad for the final polish & machine glaze. You use different pads with each step, and you should clean and wash your pads frequently. It makes your jobs come out so much nicer. Note: You can get these all this stuff from the internet, or often an easier way is to go to your local automotive paint supplier store. They can steer you in the right direction, they'll have everything in one place, and they can update you on new stuff or changes a company might have in it's products. Now you need to get your compounds and polishes. 3M's Pefect It series, Finesse It series from 3m, Meguires, etc. are all excellent products and they work about the same, but it's good to stick with the same brand. What you are going to get is: -A rubbing/machine compound (Use with a wool pad) They make heavy-duty for buffing out color sanded new paint and lighter compound for simply buffing old, worn paint. -Final polishing compound (Use with a finer foam pad) -Machine glaze (Use with a fine foam pad) They often have one for dark color paint and one for light color paint. -Hand glaze (Use with elbow grease) And that is the order you will use them... Now get your car washin' supplies, and a bunch of microfiber towels. Remember, if you drop a microfiber towel on the ground when your working, toss it to the side and get a clean one. It's amazing how much grit they get ahold of and hang on to from the ground... So, materials you need are: -A buffer (preferably an orbital buffer/polisher) -Wool and foam pads (a kit is usually easiest and cheapest) -Compounds and polishes (sometimes it's easier to get a kit) -Car washin' supplies -Microfiber towels Ok, so now how do I do it? 1. Wash your vehicle really good. Go from the top down, change your soap if it starts getting dirty, all the normal stuff... 2. Now dry it really well with the microfiber towels. Note: Buffing pads and terry cloth and microfiber towels can be washed in your clothes washer. However, don't wash them with your clothes! The waxes and cleaning stuff can stain them... Also, don't use bleach, fabric softener, etc. They can contaminate the towels which may end up contaminating your work. Just use regular detergent. 3. You may want to lightly mask off trim or anything you don't want to get compound in or on. It can go everywhere. You don't want to get compound or wax on flat black trim pieces or any textured surface. It takes just a little bit, but it saves hours of cleaning up later on. (By the way, that goes for you too! Wear old clothes or an apron...) 4. Now get your wool pad on your buffer and get your rubbing/machine compound. Make sure the pad is cleaned. They sell a tool made just to clean wool pads. It's a spiked wheel tool that you hold against the spinning pad and work it back and forth.
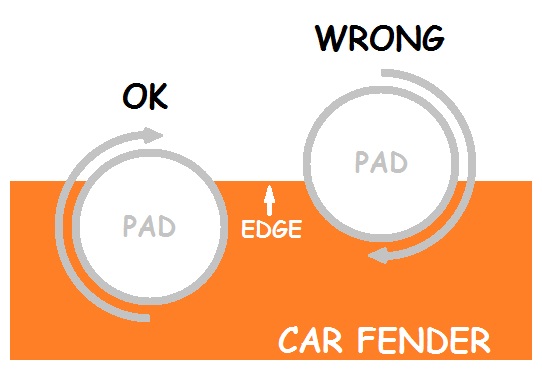
It pulls the old compound in the pad out, and preps the pad. Wool pads, even when new, should be prepped. Now put enough compound on to cover about a 2' x 2' area. From there just swirl the buffer (with it off), and spread it across the area you will be buffing. 5. Now start it up! Just start slow and get the compound into the pad and spread it around the panel to keep from flinging it everywhere. When you've got it, then you can speed up and really start buffing... Be careful to keep the pad flat to the surface rather than tilting the buffer at an extreme angle. That's how people burn paint. -For compound you want a higher speed and to move slower. (But follow the directions for your product.) Keep it moving! You never want to stop or work on one area just to "get that little spot". You will overheat the paint and burn through. Just keep going back and forth... Work the whole area. You want about a 50 percent overlap on each pass. Apply light-medium pressure at first, and as the compound starts to dry lighten up the pressure and let the buffer lightly glide across turning a higher rpm to more polish than cut. You'll be able to see it bringing out the shine and removing the dullness of the paint, light scratches, etc. It will leave swirl marks. That's ok. That's what the polish is for. Now this might take a couple times of buffing with the compound to get it right. It should be a glossy finish with no scratches, sanding marks, etc. except for the swirl marks. Now wipe the area thoroughly with a microfibre towel, being sure to remove any compound from other panels too. Also when coming to an edge, you can mask off with masking tape. Do body lines and edges by hand. It's extremely easy to buff through the paint with a buffer on edges... After you have some experience, you can buff edges, but Carefully! Buff OFF the edge, NOT into it. Buffing into the edge will very quickly eat away the paint and will leave a burn through.
6. Do the whole vehicle with compound. When you are done, clean it! Get all traces of the compound off and out from around edges, under trim, (you did mask didn't you?) You don't want any bits of compound getting into your work when you are polishing. 7. Now you start to polish. Get your fine foam pad for polish and basically follow the same steps as the compound. Small areas at a time, keep moving, etc. -For polish you want a medium speed and to move faster. (But follow the directions for your product.) You'll know when your done when all the swirl marks are out of the paint. There should be nothing there but shine. 8. Now clean again... 9. Now you can apply the glaze. This is optional. If you are happy with the polishing results, you don't neccessarily have to glaze. A glaze is not a polish or wax. It is a shine enhancing product that will produce a dramatic wet look on your paint. -For machine glaze you want a slower speed and to move quickly. (But follow the directions for your product.)For hand glaze just apply by hand... 10. Yep, clean again... 11. Now wax it. Most waxes are to be applied by hand. Some waxes can be applied by machine, but make sure it says it on the bottle. If not, the buffer can make the wax gum up making a mess. It's best just to do it by hand... Now stand back and look how good you've made the paint look! By taking your time, using the right products and following the directions, it's not hard at all to get professional results.
Return From Buffing to Bodywork
|